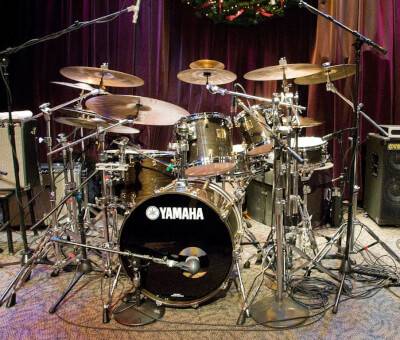
You finally purchased your new drum kit, but how do you set it up now?
A proper setup is the key to avoiding injury and producing the best sound quality. At the same time, you will be able to play more efficiently and have more fun. While there are many ways to set up your drum kit, beginners can start with the basics and then adjust. Here is a step-by- step guide for you to follow.
1. The Throne
You can start by adjusting the height of the throne, depending on what is comfortable for you. It is important that it feels balanced and centered. You can do minimal adjustments up and down until you find the perfect spot.
2. The Bass Drum
You will want to put your bass drum right smack in the middle, but with enough space on each side to build on your drum kit, as well as room behind you to move without any problem. Take note that your upper leg needs to be parallel with the bass drum and your lower leg in a straight line from the hip flexor down to the pedal. This allows you to use the downward energy from your hip when playing. To prevent the drum from sliding around when it is on top of a carpet, use the spurs on the legs of your bass drum. You should also adjust the legs’ height to ensure that the front is a bit higher. This will help your drum to resonate more freely.
3. The Snare
The snare drum also needs to be in a comfortable position, depending on your height and the optimal angle. But because you will play this more often than others, you need to focus on adjusting especially the height of the drum. If it’s too high, you will hit the hoop instead, and if it’s too low, your thighs will be caught in the middle. You can begin setting it on a belt-buckle height and just readjust. Tilt the snare towards you so that it matches the angle of the sticks.
4. The Bass Drum Pedal
Now it is time to attach the bass drum pedal. Fasten the pedal clamp only at the center of the hoop, in order to ensure a stable bass drum.
5. The Hi-Hat
The hi-hat should be ergonomically placed just like the bass drum pedal. The goal is to have a straight line from the pedal to the hip flexor. You want the 2 pedals to be forming a V formation, where you will be at the apex and your snare drums between your legs not too close that your thighs are touching them. The height of your hi-hat depends on your personal preference and playing style.
When you want to use an open-handed style on the snare and the hi-hat, then it may be set lower. However, most players cross the hands, so you need more room for the left hand to be able to play the snare drum. If you are playing punk or metal music, you will need to adjust more and allow a lot more space for the left hand, putting the hi-hats at chest height.
If you are doing both open-handed and crossover, the hi-hat should be somewhere between the chest and waist. The key is to be able to alternate positions and play easily without your hands tangling up. It is also important that you will not need to overextend yourself to reach both.
6. The Toms
The toms should be positioned in such a way that you can play those tom runs comfortably, having all parts of the kit within reach and without requiring a lot of effort. If you are holding your sticks with the tips at the center of high tom, the two other toms should be located where the sticks will still reach the centers without changing your elbow’s angle.
The height and the angle of the toms are also vital. Keeping them at the same height makes it easier for you to play them without having to adjust while playing. Moreover, they should also be at an angle that follows the slant of your sticks.
The floor toms should be at the same height as your snare drums and angled as well towards you. This way, it will be positioned similarly to the snare drum.
7. The Cymbals
This is the last step of your drum setup. Normally, you will have two, a crash and ride. The single crash is normally placed above your snare drum and high tom. You should be able to reach it without overextending yourself, and it should be comfortable for you (especially when it comes to height).
The ride cymbal, on the other hand, needs to be high and angled so that it doesn’t block the low and floor toms. At best, try it at various heights and angles until you find the sweet spot where you can still move freely and sit centered on your throne.
Finding what is comfortable for you might be tough if you are still learning how to play but thankfully, if you purchase your drum kit at a studio you may also ask them for tips on how to
set it up. Even if you have been playing for a while, you may benefit from a little advice from the experts at Red Drum Music Studios. You can also visit the studio through this link for more information or help.


This was very detailed and useful for newer drummers wondering how to get everything set up!