By Gary from Tune in, Tone up!
This supports our podcast on SoundCloud on Friday 12th May 2017 (episode 13b is about how to practise without your guitar) https://tunein-toneup.com/2017/05/05/guitar-lesson-13-how-to-practice-without-a-guitar-and-further-rhythm-ideas-and-alternate-tuning/

If I could advise myself when I first started out on guitar, what things would I say? What do I wish I knew then, that I know now? My advice would include:
1) The importance of ear training
2) Rhythm and metronome work
3) Learning the notes on the fretboard
4) Learning to sing and play
5) Aiming to play more with others and record myself
6) Learning or dabbling with different instruments – for me drums, piano and saxophone
7) To always play electric guitar through an amplifier
8) Commit the notes of each key to memory and be able to apply them to my playing
9) Develop a wide variety of techniques
10) Transcribe other guitarists solos and rhythmic playing
Clearly much of this can be tackled at any time, but gaining some experience, knowledge and skill in these areas early on will only fast-track and accelerate your learning. So with this in mind, I wanted to write about learning and exploring the notes of each key and becoming better acquainted with the fretboard – two things which can be easily studied early on in your journey.
The guitar fretboard makes it one of the least accessible instruments you can play for these reasons:
1) It is notoriously difficult to see where the sharps/flats are on the neck.
2) The same notes are repeated vertically across the neck so it is not linear like a keyboard.
3) On a 24 fret guitar, there are 6 places the same note can be played (and these notes can have a different texture / intonation depending upon the string they are played on.
4) Guitarists are often pattern-driven and this can become a way to bypass the very learning which can help to advance quickly.
5) Guitarists often don’t sight-read and so don’t learn notes on the fretboard in this way.
6) Each string moves up in perfect fourths (5 semi-tones), except the B string which is a major third (four semi-tones) above the open G string.
All this makes the fretboard to seem like an unconquerable hurdle to master. Even later in your learning, there can be parts of the fretboard which are difficult to familiarise yourself with.
An additional issue arises because the guitar itself can actually be a distraction from learning musical theory. When you pick it up, you are often drawn into playing and noodling rather than effective practise and deepening musical knowledge. Conversely, many musicians of other instruments first learn to read music and then later understand how it applies.
You may remember this comedy sketch with Eric Clapton, Lemmy, Mark Knopfler and other guitarists talking about how they only read tab and chord diagrams rather than sheet music? Even if you’ve seen it before, I encourage you to watch it – it’s superb and truth is contained within:
Guitarists (probably more than other musicians) are seeking to perform in a ‘raw’ format meaning taking the feel, sound, rhythm and tones as separate from how music is written. I believe many people, particularly as they start learning, think that standard music notation is only for orchestras, Jazz and classical music. Some guitarists are averse to this kind of theoretical effort to the point where this kind of learning is seen to almost be in the way of guitar playing. Indeed, many choose to take up the guitar for its rebellious and anti-establishment image and so do everything possible to avoid ‘traditional’ musical methodology. Guitar notation – chord diagrams and tablature – has been developed to bypass the need to read music and as a result, reading music is seen as something difficult to do. This thinking and belief, false though it is, perpetuates itself and is often affirmed through experience and discussion with others.
Recently, I returned to the study of musical theory to better inform my playing. Firstly, I began to try to develop my ear and discovered that this was easier than I thought possible and with the help of software programs like Earmaster (https://www.earmaster.com/), Transcribe (https://www.seventhstring.com/xscribe/download.html) and some of the apps from Justin Sandercoe’s website (https://www.justinguitar.com/en/AP-000-JustinguitarApps.php) I was well on my way to be able to recognise intervals when I heard them. All that was required, as so usually is the case, was some effort, motivation and time. Don’t hesitate, if you love music and wish to develop, begin this practice today! I found it useful to associate certain intervals with famous songs (https://www.earmaster.com/products/free-tools/interval-song-chart-generator.html) and then test myself continually using the software mentioned above.
The next thing which this lead onto was the learning the notes in every key well enough that during improvisation, when thinking time is short, I would be able to use this knowledge to come up with a “killer solo”. This “killer solo” is still something I’m aiming for, but failure to reach a destination does not make the journey pointless (it just means you are still on your way).

So, I picked up a notepad and several different coloured pens and began to better acquaint myself with the way each key is structured and the notes contained within. I already knew enough about the guitar that I realised things which I learn are usually usable in different areas. For example, when you learn the major scale you have also learnt the minor scale. You just need to recognise that the root note has changed to be three semitones below the root of the major scale. In other words, the C major scale is the same as the A minor scale, F# major is the same as Eb minor / D# minor and D major is the same as B minor. The sound is only perceived differently because of a) the emphasis placed on the root, third and fifth notes which are changed and b) the chord over which you are playing. It is like colour – the actual colour you see depends upon the amount of light which is available (the same blue looks very different in bright sunshine, to twilight or a low-wattage lamp).
Exercise One: write out every possible sharp and flat key.
I began by writing out all the notes of the C major scale as a list:

I then filled out the columns to the right and left with C# and Cb and noticed that the key of C# contained a B# and E#, which are the notes C and F and Cb contained a Cb and an Fb or B and E. This showed me that at some point writing out the keys in every possible sharp / flat key at some point moving right and left became unwieldy and counter intuitive.
Go on and give it a go. If you write out every possible sharp and flat key, you will find some keys where there must be double sharps (##) or double flats (bb) in order to stick to the rule of having one note per interval and not missing any letters out (CDEFGAB). For example, in the key of G# – G#, A#, B# (C), C#, D#, E# (F), F## (G), G#. There are no such complications when you change the way you look at the key from sharps to flats and look at these notes as being in the key of Ab – Ab, Bb, C, Db, Eb, F, G, Ab (much more manageable and preferable).
Exercise Two: write out each key with the most preferable sharp or flat
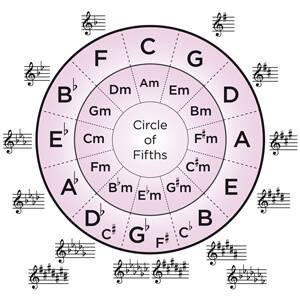
Once you have done this, write out each key so that no double sharps or flats are needed. It is helpful to notice that three keys work both as either flat or sharp and this is where the change occurs. If you change the rule to say no B#, E#, Cb and Fb, then your C# key becomes Db and your Cb key becomes B and you are only left with Gb or F# being interchangeable. This means that in effect you only have 13 sets of notes that are useful to know and these become the keys which we work with as musicians = C Db D Eb E F F# (or Gb) G Ab A Bb B and back to C. Notice also how all the non-natural notes are flattened rather than sharpened (with the exception of F#).
This is now recognisable as the circle of fifths:
Exercise Three: Write out each key starting on each note (7 modes)
Now you have each key, the next thing to do is to write out each mode of each key in columns, so first I would start the scale on the root note, then on the second note, then on the third and so on:
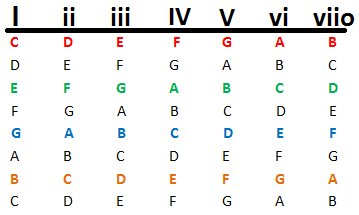
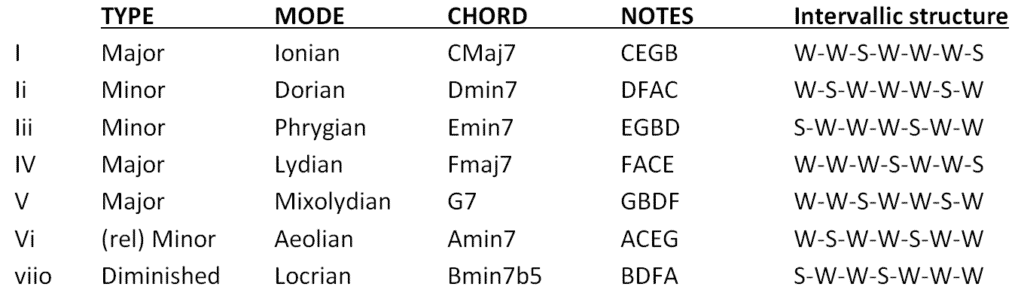
I highlighted in different colours the first note, third note, fifth note and seventh as these notes are used to form each chord in the C scale: e.g. CEG is a C major, DFA is a D minor and so on / EGBD is a Em7. Repeat the above for all 12 distinct keys and perhaps do this for the key of F# also treating it as Gb. Write out all the chords for each key.
Exercise Four: Consolidation
Find time to run through all this in your head. You will find yourself visualising the fretboard as you do this and in this way you will also reinforce your knowledge of the notes on the fretboard. I found that the best times for this was when I was doing repetitive activities like swimming lengths, cycling, running or walking. I used these times in order to scaffold and revise the keys. While doing this, I noticed patterns and began to remember the notes of each key and this was hugely beneficial when I returned to the guitar.
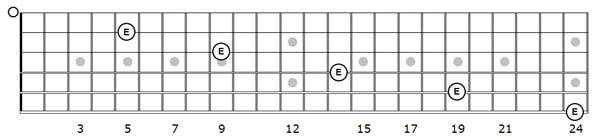
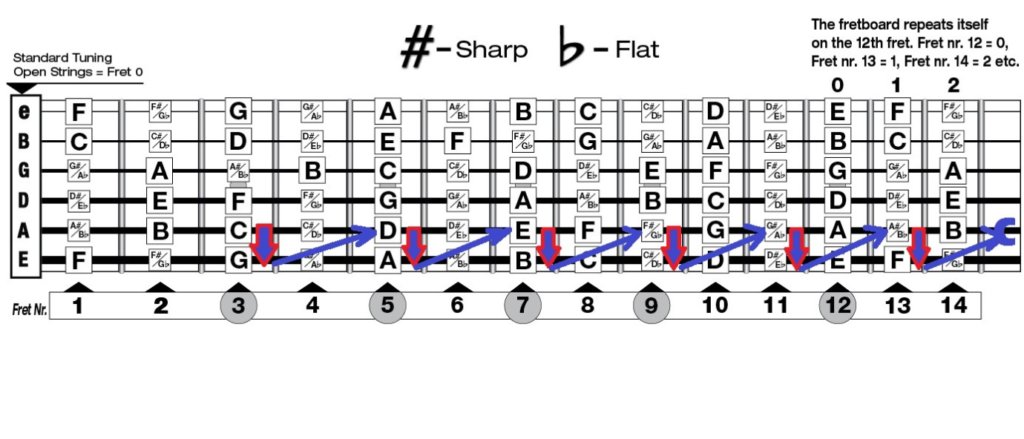
One of the most useful patterns is the circle of fifths and circle of fourths. I found it really useful to visualise this on the guitar fretboard on the bottom E and A strings. The arrows show the direction of the Circle of Fifths – the reverse is the Circle of Fourths.
Exercise Five: Learn the fretboard
Learn the notes on the actual fretboard of your guitar. I found that certain programmes would help to consolidate this in my head. I found this one very useful, but there are plenty of alternatives out there, many of which are free – https://www.justinguitar.com/en/AP-002-GuitarNoteTrainerApp.php.
Spend some time visualising the fretboard and learning areas on the fretboard which you are less familiar with. Also, place greater focus at first on the natural notes as the sharps and the flats can be learnt after this. This is the equivalent of learning the white notes on the piano and important for guitarists as the fretboard does not follow a pattern like the keys on a keyboard.
Exercise Six: Parallel modes and intervallic structures
Now that you have written out the major scales for each key and also the 7 modes of each, the next step is to take what you have learnt and work out the intervallic structure for each of the modes. A whole-tone is two frets and a semi-tone is one fret. This makes the Ionian mode structure:
W – W – S – W – W – W – S
Now work out the intervals between the notes of each of the other modes by moving the above structure along once to the left for each of the modes. List the intervallic structure in your notes for each of the modes.
Exercise Seven: Parallel modes continued
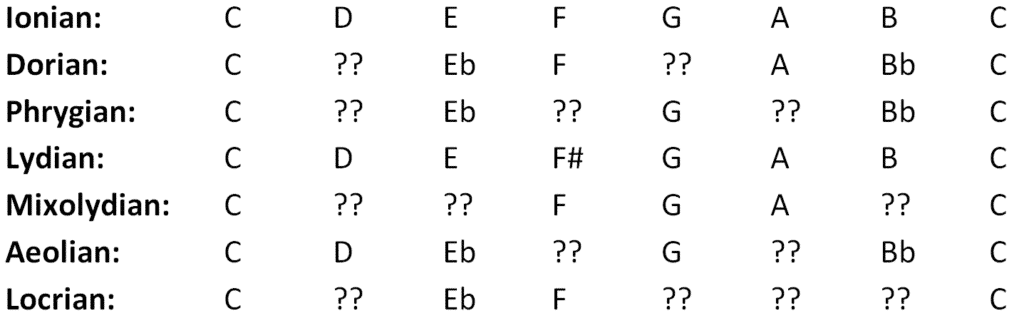
Now begin to build the modes of each key in parallel. So instead of noting all the modes of one key which is thinking in series, build each mode from the same root note following the intervallic structures which you have worked out above..
So for the key of C – see if you can work out the missing notes and then complete this exercise for all 12 keys:
Exercise Eight: Spot the rules and patterns
Once you have completed the notes for each key in parallel, it is worth taking a little time to complete this exercise: Work backwards from the modes in each key to reverse engineer the relative scales for each mode. By this I mean which major scale does each mode corresponds to? This is an exercise you can do both with and without your guitar.
a) With your guitar, you can notice the relative major scale by virtue of the patterns the mode makes as you play.
b) Without your guitar you can spot the notes and then begin to visualise how you would know which major scale you are playing with your guitar in your hand. If the mode has
What rules can you identify? See the following examples of what I mean:
- C Dorian is the same as the Bb major scale – so the rule is a whole tone below the key of the dorian mode.
- We already know that the Aeolian mode is the same as the major three frets up from the key of the Aeolian – so we can work out that the major scale for C Dorian is Eb major and this can be checked by looking at the notes of the Eb scale alongside the C Aeolian.
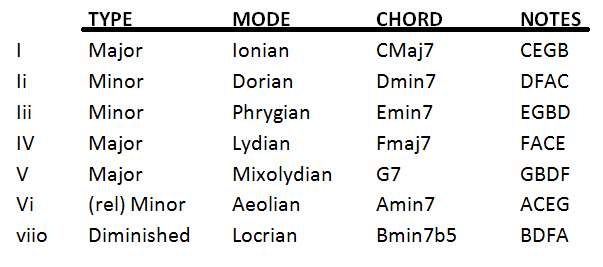
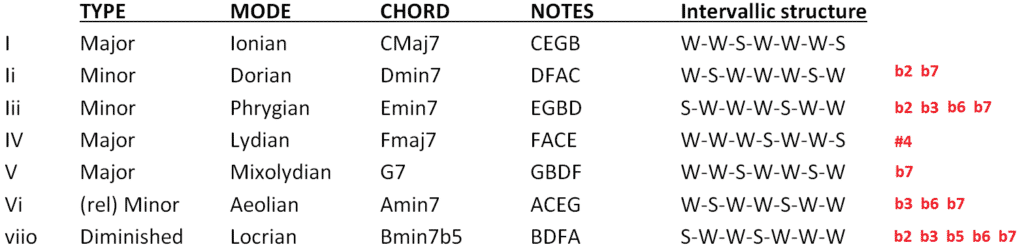
- Ionian has no sharpened or flattened intervals from the parallel major scale.
- Dorian has a flattened third and a flattened seventh
- Lydian has a sharpened fourth
Can you work out the notes sharpened and flattened for Phrygian, Mixolydian, Aeolian and Locrian?
Work out the rest of the corresponding major scales and some rules which work for you.
Exercise Nine: Practise using the circle of fifths
To practise parallel modes with your guitar you can play each of the 7 modes for each of the 12 keys in the circle of fifths starting on the C (fret 3 of the A string). Now play first the Ionian, then Dorian, Phrygian, Lydian, Mixolydian, Aeolian and Locrian with C as the root for each mode. Next move to the G (fret 3 of the E string) and play all 7 modes. Now do the same with a D root note, then A, E, B, Gb, Db, Ab, Eb, Bb, F and back to C. Notice the changing patterns and which notes become sharp or flat as you complete this exercise.
A really useful variation and one which can also challenge your rhythm playing too is to complete the same exercise except this time play the notes using eighth notes (or quavers) and when you play a sharp or a flat give this the rhythmic value of a quarter note (or crotchet). This is best done with a metronome although you may need to complete this with a slow BPM to be effective and achievable in the first instance.
Another useful variation is to play from the root notes on the D, G or B strings as well. This might get you thinking again about the notes and breaking away from the patterns.
Exercise Ten: Improvisation
Find good backing tracks for each mode and test yourself in a variety of keys by playing some improvisations. Quist is a good go to for backing tracks: https://www.youtube.com/user/QuistTV
Make notes on the chord progressions about the notes which work, or recognise what works and what doesn’t. Make sure that you are familiar with the chords you are playing over and perhaps try to play the rhythm yourself to really let the changes sink in.
Some ideas for taking all of this further
- Do something similar for the harmonic minor scale and the melodic minor scale, including harmonising the chords and modes for each.
- Look up and explore some of the other scales like the whole-tone/half-tone scale or the Hungarian for example.
- Use some of the ideas for song-writing and coming up with variations of the chords perhaps using open strings or alternate tunings.
- Explore some alternate tunings like DADGAD or Open G to see how this changes your patterns. This is helpful for avoiding being constrained by patterns (although there is value in this kind of visualisation of course).
- Perhaps explore some of the above ideas on a different instrument?
- See if you can sing all the modes of a key and build to be able to do this without needing your guitar.
- To also test and develop your ears get together with someone else learning the guitar and play notes, intervals, scales, modes and chords in turn. The other person should try to identify these notes, intervals, scales, modes and chords.
Most of all keep returning to study this topic and don’t forget to refresh your musical theory, understanding of the fretboard, rhythmic and metronomic playing and ear training. None of these things happen overnight and all require constant revision and consolidation.
I really hope you find this useful and good luck on your musical journey,
Gary from Tune in, Tone up!
• Check out our podcast here: https://soundcloud.com/tunein-toneupp
• You can find shownotes and further advice on our website: https://tunein-toneup.com/
• My online magazine on guitar related goodness: http://flip.it/p1rR8rr
• Follow us on Twitter: https://twitter.com/Shillers13
• Like us on Facebook: https://www.facebook.com/tuneintoneup/
Our lessons so far cover blues improvisation, country licks, neoclassical ideas, funk rhythms, Gary Moore, Hendrix, Led Zeppelin, chord melodies, tips on jamming and much, much more!
This looks like it will be a great site. I’m just getting back to guitar and can use the guidance.
Thanks a lot for stopping by. Glad you liked the site!
Hi there, I also keep a website and you can get that option with a Personal account, which is not hugely expensive. I played round lots with free themes and I think that some themes have this set up as an option. I hope that helps, Gary
Hey Adam! I see. Do you have a paid wordpress account? That may be the secret ingredient.
Hey… I love how your blog shows up with a “read more” link in my email… How can I set that up for my blogs?
To Be honest I don’t know. Just standard WordPress functionality I suppose. Sorry I couldn’t be more helpful.