
My Top 10 Home Music Production Tips for Singer-Songwriters.
#1: Get Set Up
Before you start, you’ll need a decent hardware and software setup with a DAW (Digital Audio Workstation) at the heart of it. Please visit my post How to set up a simple Home Recording Studio for all the info.
#2 : Decide on the Tempo and Structure.
Save yourself a lot of pain and timewasting further down the line by nailing down the tempo of the song before you start doing anything. Do lots of rough demos with vocals to make sure it’s not so fast that you are struggling over the words, or so slow that it kills all of the song’s energy. Once you start laying down audio tracks, it’s almost impossible to change the tempo, so make sure it’s right from the start.
Personally I prefer to have the complete song structure completed beforehand too, as well as the lyrics, but it’s also fine to start producing an unfinished idea and build on it on in the recording process. You never know what new ideas this can conjure up.
#3: Start with a basic Drum Sequence and add Markers
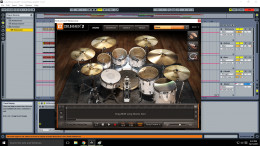
Once you have decided on the Tempo, It’s time to put down a drum track. I use Ableton Live, running EZDrummer 2 drum software. Don’t worry too much about the detail for now, as you can easily work on your drum patterns later (e,g, vary up the verses, choruses and add fills). All we need at this stage is a beat that fits, so that we can layer the other tracks over the top.
It’s also worth marking down the song sections in the DAW at this point (Intro, verses, choruses, etc) so that you know where you are when it comes to laying down the other tracks.
#4: Copy and Paste is your Best Friend.
Thanks to modern technology and DAWs, a lot of the hard work has been taken out of recording rhythm guitar and bass parts in particular. Here’s how to save yourself a LOT of time recording a rhythm guitar part for example.
- Do one take, all the way through to the end of the song, ignore any mistakes, just keep going.
- Listen to the sections of the song you nailed, say you got verse 1 perfect but slightly fluffed 2 and 3. Simply copy the section of audio from verse 1 to verse 2 and 3.
- If you aren’t happy with any sections. You can either do another full take or punch-in at the relevant part (see below)
Using copy and paste does have disadvantages, as recording in one take sounds more natural, is more varied, the you’ll get more satisfaction, but can the listener really tell?
#5: Take Advantage of Punch-ins/outs
Again, DAWs have made punching in or out ridiculously easy, so use them! You can also setup the DAW to auto punch you in and out so that your hands are free to play.
Referring to the example above, the verse rhythm guitars are now done, but the choruses need recording again. Simply set your punch in and out point to the 1st chorus and just keep spamming your recording (you can even setup a loop do do this for your automatically). Once you’ve got the chorus perfected, copy it over to the others, job done.
Another use of punch-in/outs is when you have a song that’s difficult to perform on guitar, or more commonly on vocals. Here, you would record each part in turn. E,g, punch-in – Verse 1 – punch-out, only moving onto the next part when you’re happy with it. This method is much more laborious, and doesn’t let the vocals flow as much.
When punching in/out, always pay close attention to recording levels. Any big differences in volume between parts on the same track will need to be ironed out using volume automation later on, so save yourself the hassle.
#6: Lay down a Rough Vocal Track
It’s always a good idea to record the main vocals last so that you can put the maximum feeling/effort into the song as opposed to singing along to a half finished backing track. However, after you have a simple drum track and maybe a bit of guitar done, always record a rough vocal track, so that you have a clearer reference point (than just the markers) to lay down further tracks. A good tip is to not worry about tuning too much on these reference vocals and just max-out the auto-tune if you’re way out.
#7: Abuse Auto-Tune, sparingly
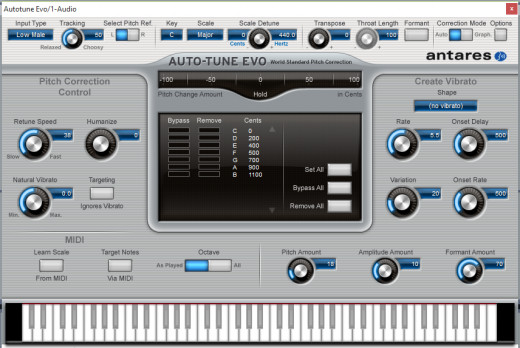
Swallow your pride, save yourself time, and always polish up your vocals with pitch-correction (in my case Antares Auto-Tune Evo). The trick to using Auto-Tune is to perform your vocal the best you can first, and set the retune speed quite low, say 30-40 (see this pic below). This will give you a nice natural sweetening of the vocal as opposed to a warblier synthesized effect that lower retune speeds give you (the classic example being Cher’s ‘Believe’).
Never rely on Auto-Tune to make a bad vocal track sound good, as you’ll end up with an unnatural effect. However, it is possible to automate Auto-Tune in the DAW to fix a couple of botched phrases here and there if you really can’t manage it.
#8: EQ
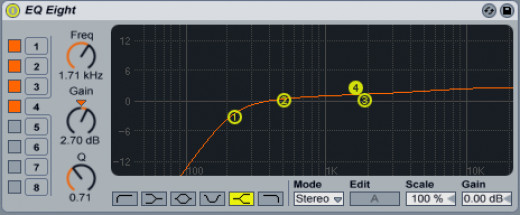
Once you have a few tracks down, you may find the mix becoming cluttered with different instruments competing for the same sonic space. This is where EQ and Panning comes into play (I’ll cover panning in the next section). Not pretending to be a sound engineer myself, I like to keep things simple and follow a few simple rules.
- I always cut the lows and shelve the highs for vocals and guitars, especially acoustics. This’ll free up the bass frequencies that the bass and bass drum occupies, whilst helping the vocals and guitars punch through. (see pics below)
- I always focus on cutting, not boosting frequencies, as boosting adds gain and may cause unwanted distortion.
- I never EQ the drums as I use drum software which’ll be mastered later anyway.

#9: Panning
In a addition to EQ, Panning also adds separation and clarity to the mix. The idea here is that you think of the mix as an actual ‘band’ playing the song, and think about where the various instruments are located in the stereo mix of what’s being heard through the p.a.
- Drums. With some elements panned right (toms, cymbals etc), some left (other toms, cymbals) and some in the centre (bass and snare), and because I’m using drum software in stereo, nothing needs be done with regards to panning here. Leave it dead center.
- Bass. Panned center.
- Rhythm guitar. Slightly panned to the left /right depending on the whereabouts of other instruments. Either keep them out of the way of each other for width, or together for a thicker effect. Don’t pan it too far left or right as it will sound too disconnected from the other instruments.
- Backing vocals – Pan hard left / right depending on the whereabouts of other backing vocals. Again you can also stack backing vocals in the same stereo location for a different affect.
- Main Vocals – Center, As this is the most prominent ‘instrument’.
- Lead Guitar. Centered during solos, panning hard left/right for ensemble playing or split lead.
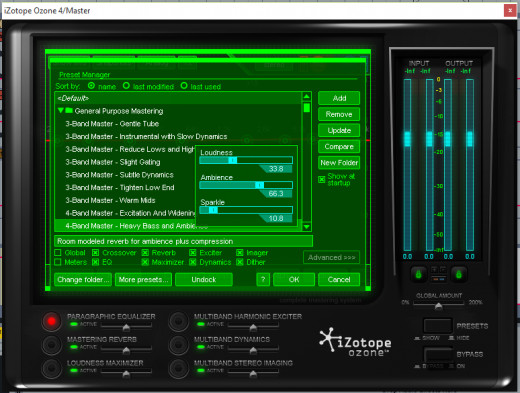
#10: Use Mastering Tools
As mentioned earlier, I’m no sound engineer, so I use the tools available to me that add the finishing sparkle to a decent mix. I simply drag in my Izotop Ozone plugin onto the master track and compare a few presets.
Thanks For Reading!
I hope you’ve found my Top 10 Home Music Production Tips For Singer Songwriters enjoyable, informative and useful for your own endeavours. Please follow the links to my other songwriting/recording hubs and also my Soundcloud page which includes all my own songwriting and production efforts.
- How to set up a simple Home Recording Studio for Sin…
This Hub details how to setup your own home recording studio including the hardware and software involved and tackles the problem of latency.
- How to Write a Song
Songwriting hints, tips and insight for Beginning Songwriters
- Adam Harkus | SoundCloud
Singer Songwriter music, lyrics, and videos from North Shields, UK on SoundCloud
Reblogged this on New Art United.
Many thanks Helen!
Hi Adam. Thank you for following me and I am now doing the same.
Great to have discovered your blog. One of my sons is a musician and songwriter as well with his own recording set-up himself.. I’ll send him your details as I know he’ll be very interested. All the best. Kris.
HI Chris, thanks for reading and glaf you enjoyed it. Much more to come!