The HX Effects brings the sounds of Helix in a smaller unit for use with your favorite pedalboard setup. The Helix Native plugin brings all of the Helix to your favorite recording software. Without a doubt, Line 6 is spreading the love around for everyone to enjoy. I use Helix to record and write my originals, and as my main effects unit for cover bands. Whatever software or hardware I get my hands on, I do tend to push them to their limits to see what they can and cannot handle. With that said, I’ve pushed the Helix VERY hard. The dual-processors and high power of this beast have lent itself to a vast array of possibilities. I’m not sure how many people out there hit the DSP limits on this thing, but it’s a tough bar to reach, that’s for sure. I’ve pushed it to flatline a few times, but I tend to do that. You won’t know what you can truly do until you find out what you can’t do sometimes.
Here are a few tricks that I love using in studio recording:
Automation is a wonderful thing when recording. You can use it to tweak things like delay, EQ, gain levels, volume, and more as a track progresses throughout your song. The point of automation is to adjust parameters and settings within your recorded tracks without having to lay down a completely new track with different parameters. With the Helix, you can summon similar magic, without the voodoo of automation. The alternative involves using Helix’s incredibly powerful control assignment and snapshot features.
Let’s say you want to run a single guitar track that plays a little rhythm with a light crunch, then jam out some lead fills here and there, then nailing a beastly solo, and finally coming back out of the solo to finish off with rhythm. Just like playing live, you can pull this off with the Helix in the studio but with an incredible amount of control and nearly limitless options.
All of the Helix’s parameters can be assigned to any footswitch, and without limits on how many assignments per button. The same goes for one of my favorite boundless features:
SNAPSHOTS.
- Setup a snapshot of your rhythm sound. Just the right amount of light gain, whatever EQ settings, maybe a bit of reverb.
- Set the second snapshot with a gain increase, maybe a compressor, and a volume pedal gain boost of about 1 or 2 decibels.
- Finally, prepare your lead snapshot with all of the gain, compression, reverb, and maybe even a bit of delay that you desire. Throw the volume pedal’s gain settings up to about 4 decibels (give or take) for your lead boost.
NOTE: With all reverb and delay, it’s a great idea to use the “trail” settings. Trailing will allow the effects to roll over a little even after you’ve switched snapshots (or turned the effect off entirely.) They fizzle off naturally on their own and create a bit of a crossfade effect. With the right settings, you can use this sometimes to give the illusion of overlapping tracks in a live performance. I love that.
Using these snapshot settings, you can jam through an entire song in the studio and trigger parameter changes from one song section to another. Want to push the boundaries? You can. I like to put MANY adjustments on a single footswitch or snapshot. For instance: One press from rhythm to lead will change my gain, EQ (maybe mid adjustments), reverb, delay, compression, volume, and even amp settings such as sag and bias; All of that in a single stomp switch! Full control without actually changing channels. I use these settings live, but they are great in the studio, too.
Another great feat in the studio is layering. Today, many people put lots of tracks overtop one another to create an orchestral sound. Four guitar tracks all playing the same chords will give the mix a nice dense tone. Orchestras use groups of instruments not only for volume but to create an overall tone. A single violin sounds quite different from a group of 20 violins. In the studio, musicians have adopted this concept to make rhythm tracks sound beautiful. I’ve used multiple tracks with various parameters and panning just to record songs which were intended to be nothing more than a single instrumental acoustic guitar tune. The end result is outstanding.
Here’s a time-saving tip for orchestration that I’ve adopted using the Helix and it’s powerful Double Take effect and duo-amp simulation.
Setup to record in stereo out from the Helix into your favorite software. You can record the left/right channels on separate tracks or one, it won’t matter so long as they record in stereo. The key to “3D-audio” is similar to 3D films: We have to trick the ears the same way we’re playing tricks on the eyes. Stereo is important in this technique!
In the patch settings on the Helix setup, a patch with dual amplifiers and choose only stereo effects blocks to use after the amps.
Tip: You may need to place one amp in each of Helix’s chains to avoid DSP limits.
The amps can be the same or different if you prefer, I’ve produced some fantastic sounds with mixed amplifier types. Now, After the amp blocks but before your stereo blocks (reverb, delay, etc.) dial-up Line 6’s doubler effect block (Double Take) from the modulation branch of effects options. The doubler is brilliant, be sure to choose the stereo doubler for full effect, too. In the doubler’s settings, dial in the maximum number of duplicates, and tweak the parameters to your liking. Using the doubler with the dual amps and stereo output into your recording software will give you an onslaught of multi-track sound… in a single track!
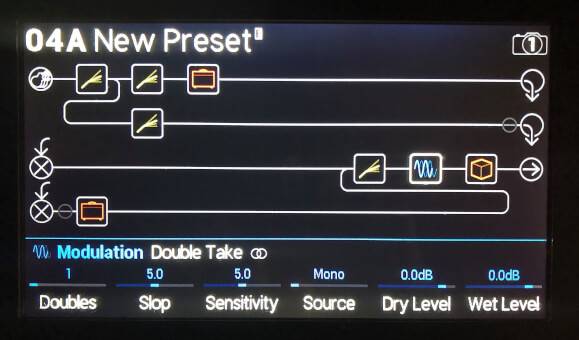
For a more in-depth look, here’s a snapshot of a simple multi-track stereo patch:
Starting at the top, I have my noise gate set first and after that, the signal is split. Signal 1A is now running into a compressor and an amp. Signal 1B is running into a separate compressor. Because you cannot power 2 amps on one chain, I’ve finished the first chain there. 1A continues on to feed 2A in the next chain down. 1B does the same feeding 2B. Our A chain is complete so it travels straight on to the end (in chain 2) to pass through post-compression, the Double Take, and reverb. Remember, the doubler and reverb are stereos out. Chain 2B contains my second amplifier, that signal is then passing on through into the same post-compression, doubler, and reverb. The stereo output will split these two signals and blend them wonderfully as long as you take the Mixer block and pan hard left/right for the chains heading into our post-effects. The end result is that with just those 8 little simple blocks we have a great mix of sound. Two amps, both duplicated up to 2 or more times. With 4 duplicates and the duo amp settings, you can output 8 amps with distinct variations into a single stereo track.
Finally, I’d like to share one of many of the live rig settings that I use in Helix. A current cover band that I’m working with, Zen Pirates, covers everything. We do rock, funk, country, pop: We play a bit of everything, really covering songs from the last 4-6 decades. I have patches for individual songs that have some special automation like the ones I mentioned earlier for recording. For now, I’d like to share my main patch which I love to use with this band.
First, let’s take a look at the effects chain.

I’ve seen many great patches online. This one that I’ve created is on the more complicated side.
The initial guitar signal is passing through a noise gate and my favorite compressor. That continues into a distortion pedal (screamer), phaser, and wah. The signal is then split. In row 1A, the signal continues into what appears to be 2 amplifiers. One amp is my clean amp (Line 6 Litigator), and the other is what I use for a light overdrive (Line 6 Epic.) I run the Epic at only 3 on gain, it’s fat enough in tone and sustain without the need of a lot of distortion in this situation.
That chain heads down from 1A to 2A. You’ll notice 2A begins with a distortion block. Someone else may find a workaround that I’ve overlooked, but for now, I’m only using this block to bypass 2A chain when I need to – the distortion level is set to zero (killing the signal entirely.) In this case, I use this distortion block as a signal kill-switch. 2B continues into an impulse response with a wonderful Marshall cabinet IR that I discovered online. Next stop: Post-compression, volume pedal, chorus, delay, reverb, and looper. That’s the end of the 1A to 2A chain, which is my first signal.
The split at the top of 1A heads off into 1B which also has a moot distortion block. This block is NOT set as a kill-switch, but rather it’s set in bypass mode(off entirely) just as a place-holder to split my chain. This is the only way that I’ve found to split chains into A/B – you must have a block in the B chain or the chain simply disappears. The empty 1B signal sends over to 2B on the bottom row. From there, you’ll notice 2B doesn’t have anything but ONE block: My 3rd amplifier. This is the Line 6 2204 Mod which is a GREAT sounding Marshall-like amp. That signal travels up to 2A just past the kill-switch distortion and into all of the post-effects listed before: Impulse response, post-compression, volume pedal, chorus, delay, reverb, and looper.
Now let’s look at the stomp switches. I absolutely LOVE the way Line 6 has set these up with custom labels. You can call the buttons anything you’d like, even use old-school style ASCII emojis if you’re feeling giddy. In order to utilize as many switches as possible, I’ve gone into the Helix settings and changed the number of stomp switches from 8 to 10. When set to 8, the far left 2 will change banks. I don’t switch banks often, so I’m using all 10 switches for full control.
So from left to right…
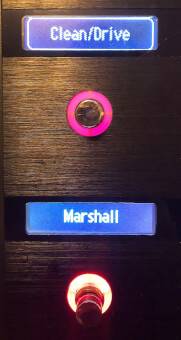
The first two stomp switches are my amps. The top reads “Clean/Drive”, the bottom “Marshall”. The Clean/Drive switch swaps which of the 2 amps (Litigator, Epic) from chain 1A that I feel like using. This is like switching from a clean to a crunch channel on a single amplifier in a way, but it’s using two different amps instead. The Marshall is my third and heaviest amp in chain 2B. The kill-switch block (distortion) in chain 2A will go on when the Marshall is active, which cancels the other two amplifiers no matter which of the two are on.
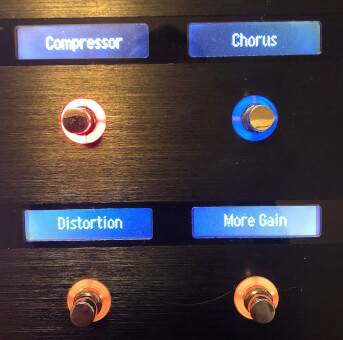
The next two switches over are my compressor and distortion (Screamer.) I like to keep the screamer’s gain levels a bit low, this way I can use it with ANY of the 3 amps for a boost without overwhelming the high-gain Marshall amp. In this case, the distortion will fuzz the clean channel, boost the dirty, and turn the Marshall into a fierce and angry beast. Next to the distortion, you’ll notice a switch which I’ve labeled, “More Gain.” I think it speaks for itself, but what it’s doing on the back end is raising the Screamer’s gain from the minimum to the maximum level. I don’t use the “More Gain” switch with the Marshall, it’s overkill. I use this switch with the other two lighter amps to give them each more distortion without the need of an entirely separate distortion pedal block; This also preserves tone. Now all three amps can run either as-is, with overdrive, or with boosted overdrive (excluding the Marshall, of course.)
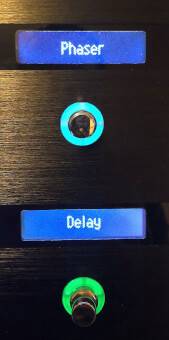
Above the More Gain switch is my chorus switch. Next over we have the switches for my Phaser and Delay. I’m partial to the script phase effect, it’s always been a favorite of mine. I’m fairly simple in my delay use, I just like it for fullness, so I use the simplest delay block and settings.

Lastly, I have my Wah and Lead Boost. You might be asking yourself, “Why didn’t Niko just use the built-in switch in the expression pedal to control Wah?” You certainly can, I prefer it with this setup just to avoid having to lean into the expression pedal; It’s quicker. For certain songs, I do have patches setup using the built-in switch beneath the pedal. The lead boost is my volume pedal block. I like a standardized boost, so I have the pedal block set to go up about 4 decibels. The block is bypassed and when I hit the boost switch the volume block turns on and jolts me up for my leads. Again, you can do this gradually with the expression pedal, but I don’t have it set up that way.
My setup is very much a core setup for many guitar players using elaborate pedalboards. I enjoy the way the Helix allows for all of that power and all of those options, but with the simplicity of one clean unit on the floor.
One last thing… if you like using the expression pedal (and it’s switch) to control wah and/or volume you can free up a switch (as I’ve used them all up) and utilize an open switch to control the Looper that you see at the end of my chains. I don’t use a looper much, so I just trigger it manually with the bypass button on the Helix. I mostly use it just for an intro or two, so it’s easy enough to do before the song starts. The Helix allows us to cancel the looper entirely with a foot switch option which will bring all of the original stomp settings back up when the looper is off. If you’re big on loopers, you may want to assign it’s bypass to a switch, however.
I’ll share more patches real soon! If you decide to try out or even tweak any of the tips, tricks, and settings I’ve mentioned today please feel free to share them. I’d love to hear what others are doing out there. Musicians have pushed boundaries forever. The more we push those boundaries, the higher the bar will be raised by companies like Line 6. Keep on pushing!
~Niko Lalangas
More from Niko @ The Blogging Musician
Contributor Spotlight : Niko Lalangas
Line 6 Helix Guitar Multi-Effects Review
Great uses for the Line 6 Variax!
Line 6 Helix Review features on their company newsletter
The Old Music Industry, Murder By Internet
My Current Live Guitar Rig Rundown
Line 6 Spider V, FBV 3 Pro Foot Controller, and Relay G-10 Wireless System Review!